


Table of contents
Hi readers! Today I want to share about my learning regarding GRPC framework. From the website, GRPC is a modern open-source high-performance Remote Procedure Call (RPC) framework that can run in any environment. It can efficiently connect services in and across data centers with pluggable support for load balancing, tracing, health checking and authentication. It is also applicable in last mile of distributed computing to connect devices, mobile applications and browsers to backend services. RPC protocol itself enables users to work with remote procedures as if the procedures were local. Long story short, in Java term, it makes external API call to look like it is just a method call. Of course people using it just not simply because of this reason. There are benefits of using especially GRPC framework to communicate between services which you can google it. Based on my personal experience, it is widely used by companies using micro service architecture to facilitate communication between services.
This article will present on how to setup client and server with different programming languages to show the difference between client and server code. The programming languages used are Java and Go. In this article, Java will be used to develop the server code and Go will be used to develop the client code. This article requires the readers to have basic understanding of programming language and dependency management such as Gradle.
The repository containing the code to this article can be seen here. Let's jump to the step-by-steps.
Creating Java Server
Install Gradle dependency and setup config. Add dependency and plugin to project level
build.gradleplugins { ... id 'com.google.protobuf' version '0.9.4' } protobuf { protoc { artifact = "com.google.protobuf:protoc:3.25.1" } plugins { grpc { artifact = 'io.grpc:protoc-gen-grpc-java:1.61.0' } } generateProtoTasks { all()*.plugins { grpc {} } } } sourceSets { main { proto { // In addition to the default 'src/main/proto' srcDir 'src/main/resources/proto' // In addition to the default '**/*.proto' (use with caution). // Using an extension other than 'proto' is NOT recommended, // because when proto files are published along with class files, we can // only tell the type of a file from its extension. include '**/*.protodevel' } } test { proto { // In addition to the default 'src/test/proto' srcDir 'src/test/protocolbuffers' } } }This dependency will help us to build generated classes from proto file using Gradle wrapper instead of Proto compiler known as
protoc. Note the string path passed tosrcDirmethod, it will tell the plugin where to find the proto file.Create proto file and generate the Java class . The proto file implementation can be seen below. This proto file is named
Item.proto.syntax = "proto3"; option java_multiple_files = true; package grpc.service.item; option go_package = "grpc/service/item"; service ItemService { rpc getItemById (ItemRequest) returns (ItemResponse) {} rpc getItemsByName (ItemRequest) returns (stream Item) {} //rpc updateItem (UpdateItemRequest) returns (stream ItemListResponse) {} } message ItemRequest { int32 id = 1; string name = 2; } message UpdateItemRequest { int32 id = 1; string itemName = 2; string description = 3; } message ItemResponse { Item item = 1; string message = 2; } message Item { int32 id = 1; string itemName = 2; string description = 3; }As you can see, the GRPC service that we are trying to develop is called
ItemService. This class will have 2 RPC methods calledgetItemsByIdandgetItemsByName. Besides that, there are several points that need to be highlighted.syntax = "proto3";Tells which version of proto syntax we are using. Currently there areproto2andproto3option java_multiple_files = true;If set to true, the Java classes will be generated on separate filespackage grpc.service.item;This sets the output path of the generated classesservice ItemServiceThis is the GRPC service definition. It will generate an abstract Java class with nameItemServiceImplBaserpc getItemById (ItemRequest) returns (ItemResponse) {}This is an RPC method definition. The method name isgetItemByIdwhich receivesItemRequestmessage and returnsItemResponse. Note there also exists an RPC method whichreturns (stream Item)signature. This enables user to load the stream response as stream and receive it asynchronouslymessage ItemRequestdefines a message which will be generated to Java class. Each field should have its corresponding field numbers and these numbers must be unique, should not be changed when already used, and should not be reused inside the same message.
After creating the proto file, generate the Java class using the previously installed Gradle plugin by calling ./gradlew build . The Java classes would be generated to path app/build/generated/source/proto/main just like the screenshot below

Implement service extending Base class
Create
ItemServiceImplwhich extends the generatedItemServiceImplBase. The implemented methods should looked like the screenshot below
Note all the methods have
voidreturn type. In GRPC, Responses are returned usingresponseObserver.onNext(). We can have multiple responses or called "stream" of responses just like thegetItemsByName()method. When we want to end the method execution, callresponseObserver.onCompleted().Publish service
Inside the main Class, implement the example code below
 public class App {
     public String getGreeting() {
         return "Hello World!";
     }

     public static void main(String[] args) {
         Server server = ServerBuilder.forPort(8090)
         .addService(new ItemServiceImpl())
         .build();
         try {
             System.out.println("Server running on port 8090");
             server.start();
             server.awaitTermination();
         } catch (Exception e) {
             System.err.println("Failed to start the GRPC server");
         }
     }
 }
And then, run the service using
./gradlew run
Test the GRPC service using Postman
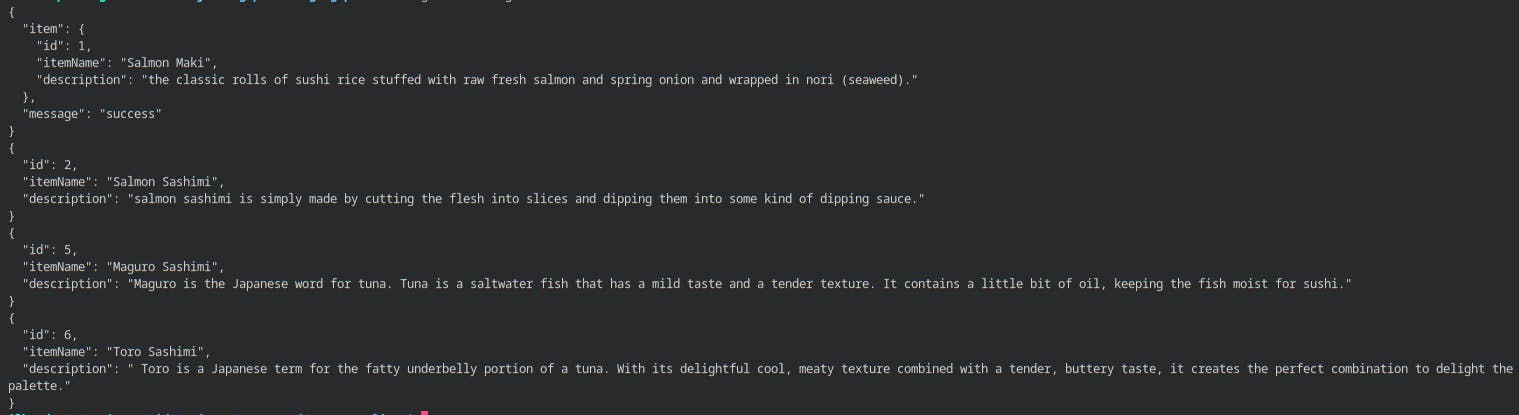
Postman now has a beta feature which enables developer to test GRPC services. The tutorial on how to create the request starting from importing the .proto file can be seen here. Example rpc method tested was getItemsByName which returned stream of Item. The result can be seen below.

As you can see, the method returned 3 separate responses because we call responseObserver.onNext() 3 times inside the loop based on the number of items matched.
We have done creating the Java GRPC service. Now we will move on to create an example of Go GRPC client.
Creating Go Client
As the time of this blog is written, GRPC requires Go version 1.19 so you may need to update your existing Go version
Get dependency
To add dependency, add the import code below to your main.go and then run go build
import "google.golang.org/grpc"
This will add the required dependencies to go.mod
Copy proto file from java
Copy previously created proto file. In my project, I saved the proto file into proto/item package. You may have noticed this block of code.
option go_package = "grpc/service/item";
It was added because there was a warning when compiling using protoc such as
2024/02/20 09:52:45 WARNING: Missing 'go_package' option in "proto/item/Item.proto",
please specify it with the full Go package path as
a future release of protoc-gen-go will require this be specifie
Run the compiler using this command
protoc --go_out=. --go_opt=paths=source_relative \
  --go-grpc_out=. --go-grpc_opt=paths=source_relative \
  proto/item/Item.proto
It will produce files with .pb.go suffix. The file with _grpc.pb.go contains the service abstract definition and the file with .pb.go will contain struct generated from proto message definition
Setup client
Inside the main.go , add these snippet code
package main

import (
    "context"
    "encoding/json"

    pb "go-grpc-client/proto/item"

    "google.golang.org/grpc"
    "google.golang.org/grpc/credentials/insecure"
)

func main() {
    conn, err := grpc.Dial(":8090", grpc.WithTransportCredentials(insecure.NewCredentials()))
    if err != nil {
        println("Failed to connect to GRPC server, cause: ", err.Error())
    }
    defer conn.Close()

    itemClient := pb.NewItemServiceClient(conn)
    getItemById(itemClient)
    getItemsByName(itemClient)
}

func getItemById(itemClient pb.ItemServiceClient) {
    stream, _ := itemClient.GetItemById(context.Background(), &pb.ItemRequest{Id: 1})

    item, _ := stream.Recv()
    jsonByteArray, _ := json.MarshalIndent(item.GetItems(), "", "  ")

    println(string(jsonByteArray))
}

func getItemsByName(itemClient pb.ItemServiceClient) {
    stream, _ := itemClient.GetItemsByName(context.Background(), &pb.ItemRequest{Name: "sashimi"})

    item, _ := stream.Recv()
    jsonByteArray, _ := json.MarshalIndent(item.GetItems(), "", "  ")

    println(string(jsonByteArray))
}
the grpc.Dial() creates a conenction to a given target. Then the pb.NewItemServiceClient(conn) returns an ItemServiceClient interface to call the GRPC service. The function getItemById and getItemsByName handle the parsing request and response.
Example call
Inside the main() function, there are already 2 example calls to get the items by name and get specific item by id. When you run go run main.go it will call the Java GRPC service previously ran and parse the response just like the screenshot below
Conclusion
So far we have implemented GRPC example with Java service and Go client. If you're feeling confused, don't worry cause you are not alone :). I myself also found it quite confusing in the first place and wondering why using RPC instead of REST. But, as you may know companies have been using it to support their business processes and so far they are happy with it and I'm sure they have a good reason of why they are using it.
Next steps
After completing this tutorial, I intended to extend this project to further accommodate CRUD capability of the server since I only implemented the read capability. On the client side, I intended to deep dive about dependency injection using Wire. Hopefully, I can publish the new article about this soon!